Baby Choking First Aid: Complete Guide to Infant Back Blows, CPR & Prevention
Manage Easier with BebeSnap
Get Started FreeEvery parent dreads this moment: your baby is eating, and suddenly they go silent, their face turning blue. Choking is every caregiver's worst nightmare, and for good reason. According to the CDC, choking is the 4th leading cause of unintentional death in children under 5. But here is the reassuring truth: if you know the right steps, you can save your baby's life. This guide walks you through infant choking first aid, CPR, and prevention strategies so you can respond with confidence if the unthinkable happens.
Choking vs Gagging: Know the Difference
When your baby makes loud gagging noises during mealtime, it can be terrifying. But not every scary-sounding moment is a true emergency. Understanding the difference between gagging and choking is the first and most important step.
| Feature | Gagging | Choking |
|---|---|---|
| Sound | Coughing, sputtering noises | Silent — no sound at all |
| Face color | Red | Blue or purple (cyanosis) |
| Breathing | Can breathe | Cannot breathe |
| Crying | Can cry | Cannot cry |
| Action | Watch and wait (self-resolves) | Immediate first aid needed |
Why is gagging so common in babies? Because an infant's gag reflex is triggered much further forward on the tongue than in adults. This means babies gag more easily, but it also means their body is doing its job: pushing food away from the airway before it becomes dangerous. Gagging is loud, messy, and alarming — but it is actually your baby's built-in safety mechanism.
💡 Gagging is your baby's natural protective reflex. If your baby is making noise and coughing, they are handling it on their own. Stay calm and let them work through it.First Aid for Choking Infants Under 1
⚠️ NEVER use the Heimlich maneuver (abdominal thrusts) on an infant under 1 year old. An infant's ribcage is fragile, and abdominal thrusts can cause rib fractures, liver lacerations, or internal organ damage.If your baby is silent, turning blue, and unable to breathe or cry, choking has been confirmed. Act immediately with the following steps.
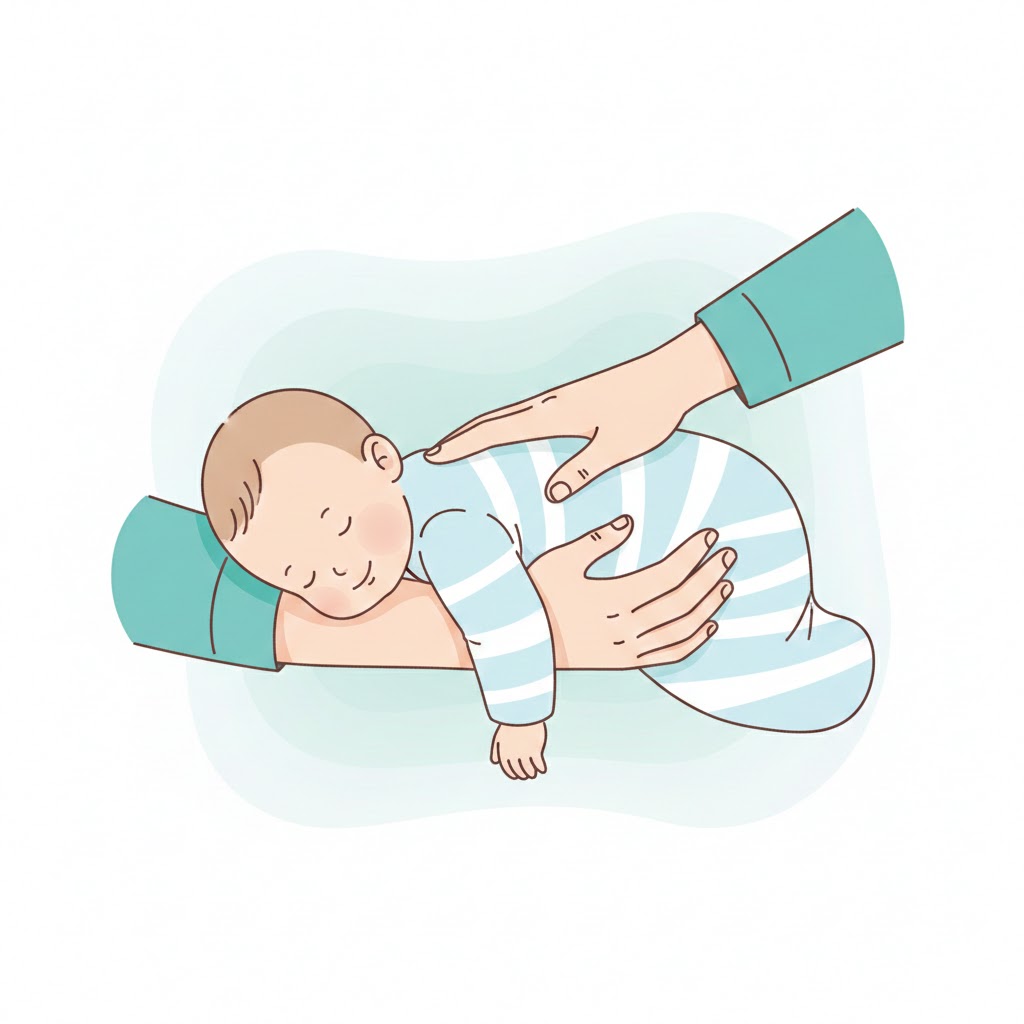
Step 1: 5 Back Blows
- Place your baby face-down along your forearm, supporting their jaw and head with your hand
- Keep their head lower than their chest, using gravity to help dislodge the object
- Using the heel of your other hand, deliver 5 firm back blows between the shoulder blades
- Each blow should be forceful enough to potentially dislodge the object
Step 2: 5 Chest Thrusts
- Supporting the back of your baby's head, carefully turn them over so they are face-up on your other forearm
- Place two fingers (index and middle finger) on the breastbone, just below the nipple line
- Deliver 5 quick chest thrusts, pressing down about 4 cm (1.5 inches) each time
- These compressions create artificial coughs to force air behind the stuck object
Step 3: Check the Mouth
- Look inside your baby's mouth after each set of back blows and chest thrusts
- If you can see the object, carefully remove it with a finger sweep
- If you cannot see the object, do NOT blindly sweep with your finger — this can push the object deeper into the airway
Step 4: Repeat
- Continue alternating 5 back blows and 5 chest thrusts until the object is dislodged or the baby starts breathing
- If your baby becomes unresponsive, move to Step 5
Step 5: If the Baby Becomes Unresponsive
- Place your baby on a firm, flat surface immediately
- Call 911 (or ask someone nearby to call)
- Begin infant CPR right away
Heimlich Maneuver for Children Over 1
For children older than 1 year, you can use the Heimlich maneuver (abdominal thrusts) because their bodies are sturdy enough to tolerate the pressure safely.
Step 1: Position Yourself Behind the Child
- Kneel or stand behind the child, adjusting to their height
Step 2: Place Your Fist
- Make a fist with one hand and place the thumb side against the child's abdomen, between the belly button and the bottom of the ribcage (the xiphoid process)
- Wrap your other hand around your fist
Step 3: Perform 5 Abdominal Thrusts
- Pull sharply inward and upward in a J-shaped motion
- Each thrust should be a distinct, forceful movement
- Repeat 5 times
Step 4: Check and Repeat
- Check if the object has been dislodged
- If not, alternate 5 back blows and 5 abdominal thrusts
- If the child becomes unresponsive, lay them on their back, call 911, and begin CPR
How to Perform Infant CPR
Whether caused by choking or another emergency, if your baby is unresponsive and not breathing normally, you must begin CPR immediately. The golden window is 4 to 6 minutes — brain damage can begin within this time if oxygen is not restored.
Step 1: Check for Responsiveness
- Flick or tap the soles of your baby's feet
- Call their name and watch for any reaction
- If there is no response, proceed to the next step
Step 2: Call 911 + Request an AED
- If someone is nearby, ask them to call 911 and bring an AED
- If you are alone, put your phone on speaker and call 911 while starting CPR
Step 3: 30 Chest Compressions
- Location: on the breastbone, just below the nipple line
- Depth: about 4 cm or 1.5 inches (one-third the depth of the chest)
- Rate: 100 to 120 compressions per minute (the rhythm of "Stayin' Alive" by the Bee Gees)
- Method: use two fingers (index and middle finger)
- Allow the chest to fully recoil between each compression
Step 4: 2 Rescue Breaths
- Cover the baby's mouth AND nose with your mouth at the same time, because an infant's face is small enough to seal both
- Give gentle puffs — just enough to make the chest visibly rise
- Do not blow too hard, as excess air can enter the stomach
- Each breath should last about 1 second
Step 5: Repeat the 30:2 Cycle
- Continue alternating 30 chest compressions and 2 rescue breaths
- Do not stop until emergency responders arrive or the baby starts responding
- If an AED arrives, use it immediately following the device's instructions
Top Choking Hazard Foods by Age
The majority of infant choking incidents involve food. Below are the most dangerous foods for young children. Most remain high-risk until age 4.
| Food | Why It's Dangerous | How to Serve Safely |
|---|---|---|
| Grapes, cherry tomatoes | Round and slippery — perfectly sized to block the airway | Cut lengthwise into quarters |
| Nuts | Hard, small, and irregularly shaped | Finely ground or as nut butter (thin layer) |
| Hot dogs | Round cross-section fits the airway exactly | Cut lengthwise, then into small pieces |
| Popcorn | Irregular shape with hard kernels | Avoid until age 4 |
| Hard candy | Hard, smooth, slippery | Avoid until age 4 |
| Raw carrots | Hard and can break into airway-sized pieces | Cook until soft, then cut appropriately |
| Cheese chunks | Can compress and block the airway | Shred or cut into thin strips |
| Thick peanut butter | Sticky and can form a plug in the throat | Spread thinly or mix into food |
| Marshmallows | Spongy texture conforms to the airway shape | Avoid until age 4 |
Safe Food Sizes by Weaning Stage
Your baby's ability to handle food safely changes dramatically as they develop. Matching food texture and size to your baby's developmental stage is one of the most effective ways to prevent choking.
6 to 8 Months(Early Weaning)
- Smooth purees or well-mashed foods
- Finger-length soft sticks for baby-led weaning (BLW)
- Foods should be soft enough to squish easily between your fingers
- Examples: steamed sweet potato sticks, ripe banana, avocado
9 to 11 Months(Middle Weaning)
- Soft, small lumps about the size of a pea or chickpea
- Still easily mashable between your fingers
- Introduce varied textures, but avoid anything hard or crunchy
- Examples: soft-cooked carrot pieces, broccoli florets, small cubes of tofu
12 Months and Older(Late Weaning and Beyond)
- Small chopped pieces (under 1 cm)
- Grapes must always be cut lengthwise into quarters
- Meat should be shredded along the grain into small strips
- Examples: diced soft fruit, well-cooked pasta, small pieces of tender meat
Home Choking Prevention Checklist
Food is not the only choking hazard. Everyday household items pose serious risks to curious babies who explore the world with their mouths. Use this checklist to keep your home safe.
Daily Floor Checks
- Get down to your baby's eye level (the floor) and scan for small objects every day
- Watch for coins, buttons, beads, paper clips, and earring backs
- Be extra careful with older siblings' small toy pieces
- Clean up dropped food immediately
Most Dangerous Items
- Button (lithium) batteries: the single most dangerous item. If swallowed, a battery can cause severe esophageal burns within just 2 hours
- Magnets (neodymium): if two or more are swallowed, they can attract through intestinal walls, causing perforation
- Balloon fragments: popped balloon pieces conform to the airway and are extremely difficult to remove
- Small toy parts: LEGO pieces, doll eyes, game tokens, beads
Toy Safety Standards
- Toys with parts smaller than 3.2 cm (1.25 inches) in diameter are not safe for children under 3 — this is the standard "choke tube" test size
- Check for the CPSC choking hazard label when buying toys
- Regularly inspect older toys for loose or broken parts
Track Health with BebeSnap
Keeping detailed health records and being prepared for emergencies is an essential part of parenting. BebeSnap helps you stay organized and ready.
- Health Tracking: Record your baby's daily health, feeding, and sleep patterns so you can provide accurate information to medical professionals in an emergency
- AI Health Consultation: Get instant answers to your baby health questions through our AI chatbot
- Growth & Development Tracking: Monitor your baby's milestones by age and ensure they are on the right weaning stage
FAQ
Q: Should I flip my gagging baby upside down and pat their back?
A: No. If your baby is gagging — meaning they are coughing, making noise, and their face is red — they are handling it on their own. Flipping them over is unnecessary and can actually be harmful. Only begin choking first aid if you see true choking signs: silence, blue lips, and inability to breathe or cry.
Q: Do I need CPR training?
A: Strongly recommended. Reading about CPR is helpful, but hands-on practice with a mannequin is far more effective in building the muscle memory you need during a real emergency. Organizations like the American Heart Association(AHA), American Red Cross, and local fire departments offer infant CPR classes — many are free or low-cost.
Q: Does BLW (baby-led weaning) increase choking risk?
A: According to research reviewed by the AAP, babies who follow BLW guidelines do not have a higher choking risk compared to spoon-fed babies. In fact, some studies show that BLW babies gag less frequently by 8 months of age. The keys are choosing appropriate food sizes and textures, and always supervising meals closely.
Q: Until what age is choking a risk?
A: Children remain at high risk until age 4. Foods like grapes, nuts, and hard candy should always be cut or modified for young children. Even after age 5, teach children not to run, lie down, or laugh while eating to prevent choking incidents.
References
Manage Easier with BebeSnap
AI stool analysis, feeding & sleep tracking, health reports—all in one app.
Medical Disclaimer: This article is for informational purposes only and does not replace professional medical advice. If you have concerns about your baby's health, please consult a pediatrician.
You Might Also Like
You Might Also Like
Baby Anaphylaxis: Allergy Emergency Response Guide
Baby anaphylaxis progresses within minutes, a true emergency! Trouble breathing, full-body hives, and lethargy are signs. Learn 911, epinephrine, and prevention.

Baby Eczema vs Infant Heat Rash | Symptoms, Skincare & When to See a Doctor
Is your 2-3 month old's face turning red? Heat rash resolves before age 1, but atopic dermatitis persists 2+ months. Maintain 50-60% humidity and moisturize 2-3 times daily.
Is Your Baby’s Cold Getting Worse? What Parents Should Track at Home
Track breathing, feeding, wet diapers, fever, and the day-by-day pattern so you can tell whether your baby’s cold is improving or needs medical care.